I have been gardening and growing plants for nigh on 70 years.
I was first made aware of it towards the end of January when a reader sent me a photo of his tomato plants growing in these special containers and the plants were very, very impressive.
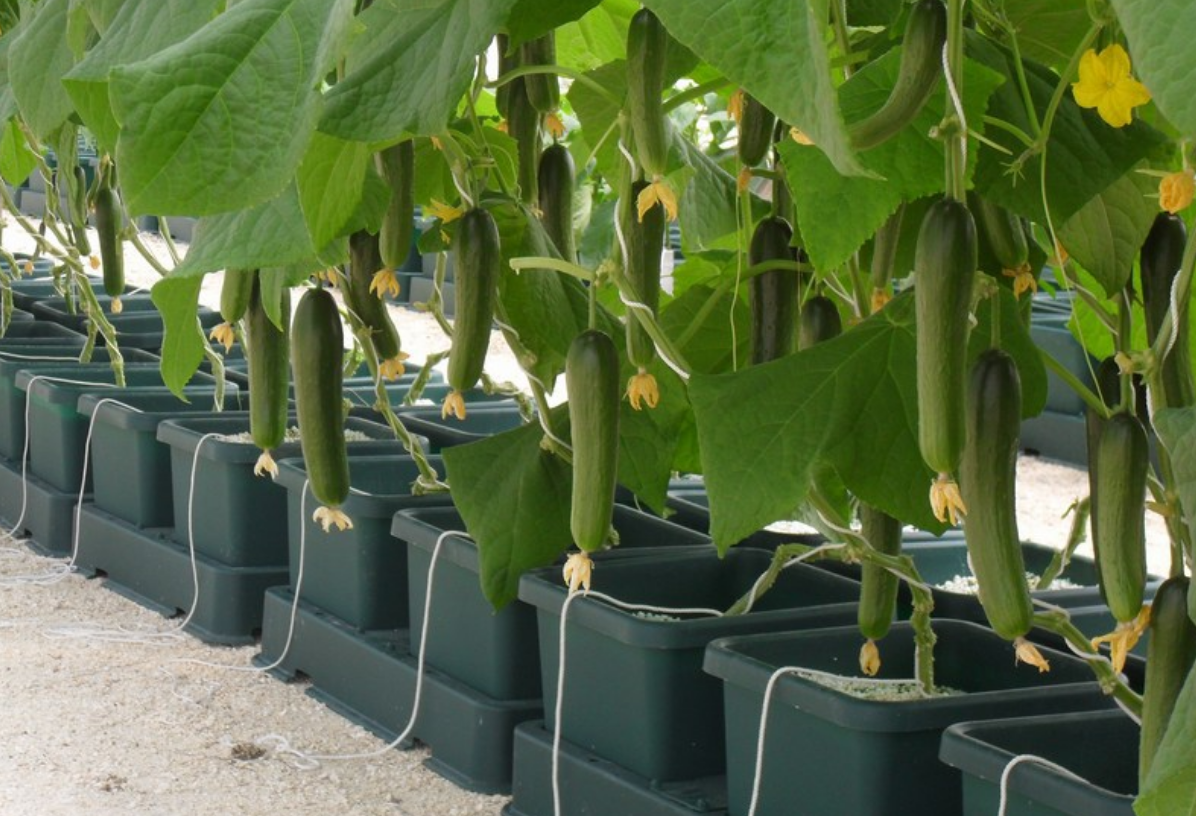
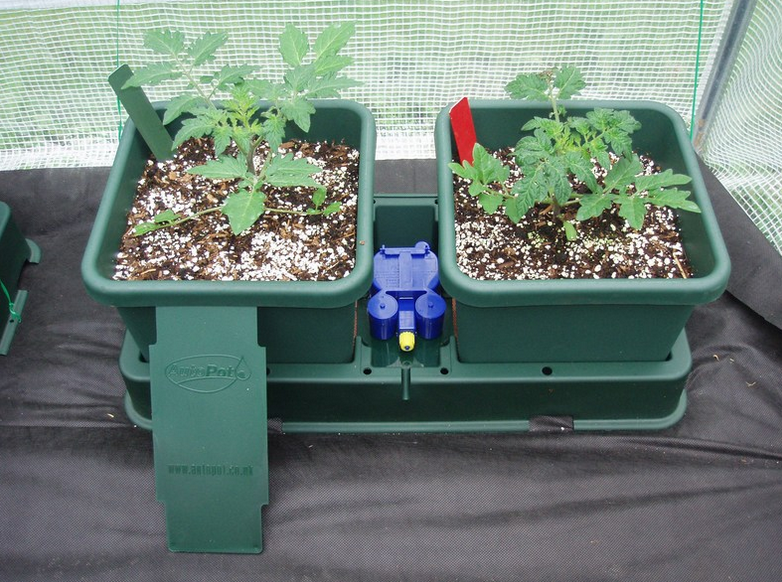
It is a system that is a bit like the hydroponics system called ‘Flood and Drain’ using a special value gate that opens to flood a tray which the plant's containers are sitting in.
The containers sitting in the tray soak up the solution feeding the roots of the plants growing in a fibre medium made from coconut fibre (coir).
No electric power is needed as the value just does its job, opens when the tray is empty and dry , fills to a couple of centimeters and turns off the flow.
The solution used is a hydroponic type solution and dependent on how many mils you add to a litre of water will depend on the CF of the solution (For those that are familiar with hydroponic solutions or not it is the Conductivity Factor which is used to measure the strength of the food..)
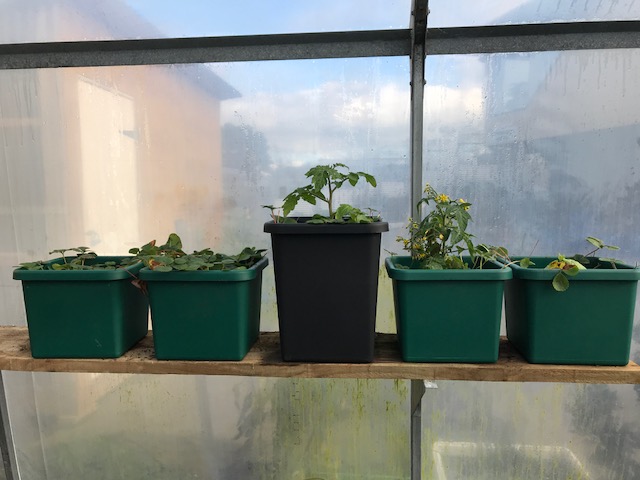
About the time that I received the containers at the end of January, I had also obtained some seeds and germinated them in small pots in the glasshouse.
I half filled the containers with the wet coir after placing the black pad at the base of the pot. (That is to prevent coir falling through the slits in the container.)
During that time I have used growing systems in just about every way possible from conventional open ground, glasshouse, aquatic, commercial nursery, container and hydroponics and never have I been so impressed as with this growing system; which I have adapted and called Wallys Hydro Flow Growing System.
Once the value has allowed about 2cm of solution to flood the tray it turns off and does not allow any further solution to enter until the tray is dry.
This means the plant’s roots are not constantly wet causing them to rot.
In fact when I cleaned out a couple of the pots of cucumber; when the cucumbers had finished for the season, I found that some earth worms had found their way into the medium and were living very happily there.
Because this system floods the tray from the holding tank and then the plants use the solution before it floods again then all the food is used and unlike hydroponics the weakened solution is not returned to the tank.
No need to measure the CF and no need to worry about pH.
You just fill your holding tank with right mix of food (Wallys Super Plant Food) for the type of plants you are going to grow and the time of the year.
There are 3 ratios: for vegetables such as lettuce, watercress, herbs it is 5mls of nutrient to each litre of water in summer.
In winter this can be increased to about 7mls per litre.
For tomatoes, capsicums, chili, cucumbers, egg plants etc. then 10mils per litre
Increased to 15 mils for growing through winter.
Also you add Magic Botanic Liquid (MBL) at the rate 2 mil per litre of solution or 20mils for 10 litres.
The reason for this is that hydroponic solutions only have the basic minerals for growing (between 8 to about 16 minerals and elements) and MBL extends this out to a possible 100 or so.
This means that the growths of your plants are much healthier and the taste is superior.
There are a few other bits that can also be added to the solution for disease control and insect control that are safe to use which we will talk about later.
The seeds I germinated were Cucumber Iznik mini F1 Hybrid a favorite of mine from Egmont Seeds as the fruit have an excellent sharp flavor and the flowers are self setting in the warmer months.
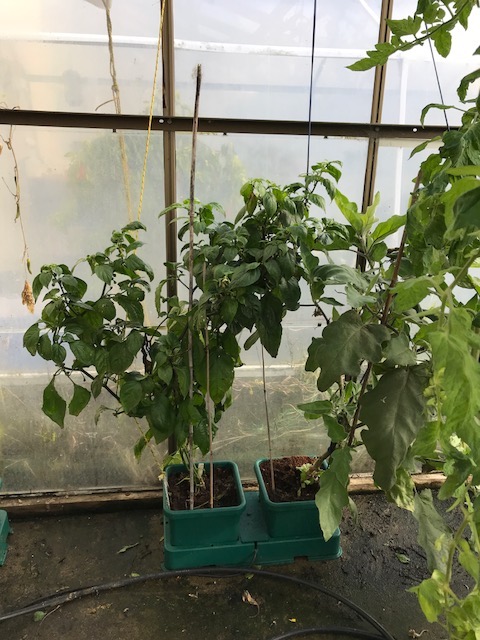
Also a seed of a long variety of egg plant (Purple Comet F1) and a hot chilli plant (Habanero Red) both from Kings Seeds.
Once sprouted and a nice handling size they were transplanted to the special Hydro Flow pots.
The Block of Coir had been soaking in non chlorinated water (if possible use only non-chlorinated water for growing for best results bearing in mind that chlorine is a chemical poison and can alter the composition of the solution.)
If I had used chlorinated tap water there would certainly not been any earthworms in the mix that I found later on.
I then sprinkled some Rok Solid and Neem Powder/granules onto the coir.
Then filled the container up to near the top with more coir.
The young plants was carefully transplanted into the coir.
Having 5 cucumber seedlings I placed three in one container and two in another these were into the 8.5 litre containers.
The egg plant and the chilli into two separate containers.
The containers are left in the glasshouse for about a week or so to establish bigger root systems in the containers before placing in the Hydro Flow system.
With the Hydro Flow trays and the two 20 litre recycled holding tanks set up the established plants were put into the trays about mid March.
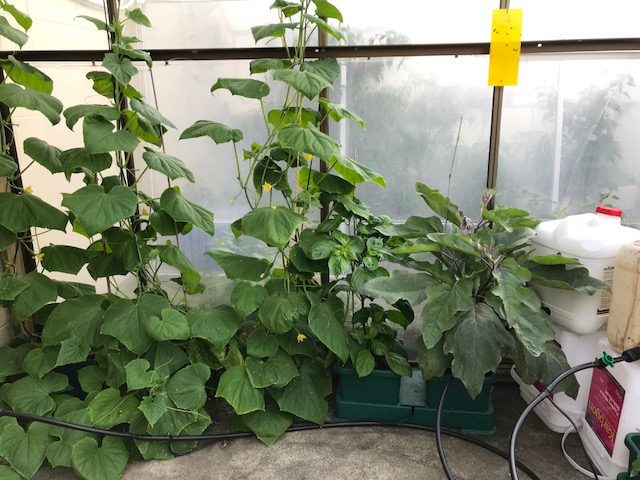
Growth was phenomenal and it was only a few weeks later that I was harvesting 10cm cucumbers.
The egg plant produced the first fruit a couple of weeks later and interestingly the fruit were far better in shape and flavor than the same variety growing in a compost mix in the glasshouse.
The cucumbers produced till about the end of May when the cold finished the plants off.
The chilli and the egg plant handled the cold better but stopped producing fruit in May also but are looking good for a re-flowering and fruiting in the spring.
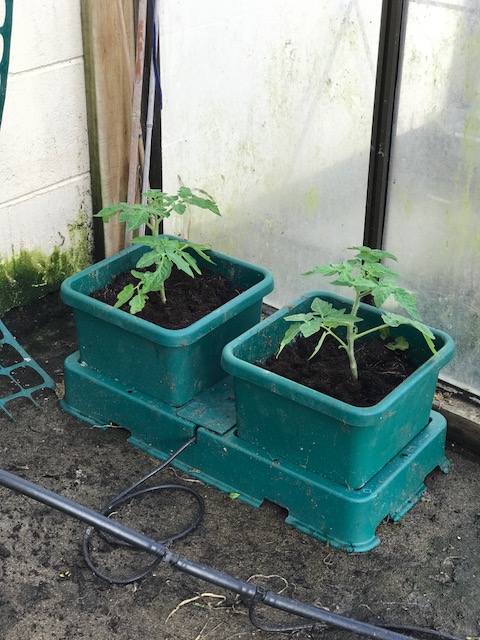
In April I germinated a special tomato plant that I have the seeds of and planted up one plant in each container.
Once again I was amazed at the growth and it was not long before the first trusses set fruit.
In Mid June the plants are healthy as anything looking.
Bottom leaves removed, lower trusses with green fruit to ripen when they are ready.
Lots of flowers at the upper parts which may set more fruit dependent on temperatures.

Being June when writing this I have set up a couple of Russian Red tomato plants into the system as I know they will set fruit in the colder temperatures.
Looking forward to having ripe tomatoes in winter and spring with no artificial heat.
For purchasing of Wallys Hydro Flow Growing Kits go to www.0800466464.co.nz
The following is a kit I have designed to start with or you can opt to just start smaller with a pot or two as in our mail order section.
CHECK LIST: Your Wallys Hydro Flow Starter Kit contains the Following Items:
One 112 Litre Taurus Storage Container (Ideal; for breaking down the Coir Brick)
Two 15 litre Autopots with two trays, two polystyrene bases and two valves.
One (twin) 8.5 Litre Autopots with tray and one polystyrene base and one valve.
This is a total of 4 growing containers as above.
Panda Film for laying on ground (white side up) to place polystyrene bases and Autopots on. (Gives more light to plants and helps deter pest insects)
One Coir Brick (Makes about 45-50 litres of growing medium sufficient to fill above)
One 2.5 Litre of Wallys Super Plant Food plus one 1 Litre of same use for measuring.
One 500ml Magic Botanic Liquid.
One 1kilo Rock Solid (Or Similar)
One 1kilo Wallys Neem Tree Powder.
One packet of Whitefly Sticky Traps
Four wire U shaped anchors for securing cord from roof.
Two 20litre recycled Jerry Cans with connector and tap for 13mm black pipe.
Two end plugs, one 13mm joiner, three 4mm off takes plus 4mm pipe.
Seeds a packet of special miniature cucumbers that are self setting from Egmont Seeds, A Wallys Special Tomato seeds (Large Beef steak type) and also tomato seeds of a Wallys summer/winter dwarf tomato plant that produce bite size fruit in winter.
Your 4 containers allows all cucumbers into the twin pots (3 in one 2 in other)
One large pot for the Special tomato (or if you prefer a plant in each 15litre pot) otherwise a capsicum or chili in the other 15litre pot.
I would put a winter tomato plant into the 8.5 litre pot that has 2 cucumbers as it growing low where the cucumbers climb.
SET UP INSTRUCTIONS
Remove all the components from the Storage Container. Check they are all there.
Remove paper cover from the Coir Brick and place inside the Storage Container and fill container with water to about half full.
Ideally this should be non-chlorinated water and if you do not have non-chlorinated water you can if you wish obtain a Housing & Filter to put on your outside tape to remove the chlorine.
Sold by Garden Enterprises for $140.00 free shipping in NZ.
Leave for 24 hours and after 12 hours break up any dry lumps and add more water as required so all coir is well soaked.
In the valve packs you will see not only the valve but also 2 squares of material one black and one gold on one side.
The black one goes in the base of the container and the Gold one sits in the tray with the gold side upwards.
This is to prevent roots getting into the valve area and the black square is to keep the broken down coir from getting out of the base of the pot.
SEED GERMINATION:
The simplest way is to obtain some expandable Peat Pots from a garden centre then you soak them (pots) in non-chlorinated water till they have fully expanded.
(Add a little MBL to water)
Sit these on a plastic meat tray (you get with meat at supermarket)
Ideally you have a heat pad or propagation pad for germination in cooler weather which you can obtain from a garden shop, a brew shop or on Trade Me also sold as Reptile heat pads.
The heat pad is placed onto a polystyrene pad 3 or 4 cm thick so that all the heat is driven upwards. The plastic meat trays with their peat pots sit on the pad. (not polystyrene meat trays)
I like to keep mine in the kitchen on a bench so the progress can be checked twice a day, morning and night.
Watering to moisten the peat pots is simply done by putting some non chlorinated water into the trays and then allowing to dry out. Likely this is done once in 24 hours.
At the first sign of the seedlings emerging and producing the first two leaves that pot with its baby plant must go out onto a shelf or bench in your glasshouse.
As seeds germinate when they want to; leave the non-germinated pots on the heat pad indoors till they also emerge.
In the glasshouse sit these peat pots onto another meat tray.
Watering will depend on how fast the tray becomes dry and whether the pots feel light and dry or heavy and wet.
In the cold months they must feel light and dry before applying more water.
In summer months likely water once or twice every day
If the seedling after germination is not moved into a glasshouse with natural light overhead it will stretch to whatever light is coming sideways and then fail.
Add about 10 mils of Wallys Super Plant food to the non-chlorinated water to water the baby plants in the meat trays.
HYDRO FLOW CONTAINER PREPERATION:
The choir brick should have become a wet mass of brown fibers.
Place the black squares supplied in the base of each pot and half fill with the wet choir.
Sprinkle about a tablespoon of Rok Solid and Neem Powder over this and then fill containers up to just below rim with wet choir.
When the baby plants in their peat pots have shown some good growth then carefully plant them into the middle of the containers. (If planting more than one into the container just space them out evenly.)
Now you sit the containers on a bench/shelf in the glasshouse so they can grow taller and develop a good root system before placing into the Hydro Flow Trays.
During this time ensure that the medium is kept a little moist and water some of the diluted Super Plant Food in every second watering.
Once the plants have established and shown good development then they are ready to go into their trays.
HYDRO FLOW HOLDING TANK PREPERATION:
With the Starter Kit has been supplied two 20 litre tanks each has a screw in connector, a short piece of 13mm tubing a tap and about a metre more of 13mm tubing. Also there are two 13mm end plugs and one 13mm joiner.
This means you could either use one tank for the twin pots and one tank for the two 15 litre pots or as I have done joined the two tanks together to feed all containers.
The tanks must sit on a concrete block or similar so they gravity feed down to the Hydro Flow Valves.
Turn both taps to off to add the nutrient and MBL
Using at the 10mil rate per litre place 200 mils of Super food into a jug along with 40mils of MBL.
Have some water in the tank then pour in the jug, rinse with more water and put into tank.
Now fill tank to top with the non-chlorinated water.
Do the same with the other tank.
STARTING THE HYDRO FLOW SYSTEM:
Take the squares of gold on one side and place into the bottom of the tray where the containers are going to sit on; placing gold side up.
This is to prevent roots growing into the tray area.
If not done already unscrew the cap on the Hydro Flow Valve and put over the 4mm tube supplied and then push the tube into the inlet of the valve and do the fastening screw up to finger tight.
Take the Hydro Flow Valve with its now 4mm tube and sit it into the space in the tray designed for it. You will notice that there is a half circle in the base of the valve and a corresponding spot for that to fit over to hold it secure.
There is a slot on the side of the tray for the 4mm tubing to pass though.
On the other end of the tube is a pointed connector which is going to be inserted into the 13mm tube coming from the tanks.
Have this all in place with piping before you do the next step.
With a sharp nail or miniature screw driver, make a very small hole in the 13mm tubing to insert the 4mm connector.
The amount of tubing supplied gives you room to move the trays and tanks around a certain amount.
Next place the Panda Film supplied white side up where you are going to place one of the trays. In the centre of the Panda Film place the right size polystyrene pad which you will sit the tray on.
Now place the containers into their respective places in the trays with their young plants.
Open both the taps on the holding tanks and you should see the area where the valve is; filling with solution.
Once this is seen; then place the plastic cover over the value area to keep out light and allow the valve to operate correctly.
Now you are growing (well the plants are)
All you have to do is check that the system is working and that the holding tanks have solution to feed the valve/plants.
Occasionally it is good practice when the holding tank needs re-filling partly re-fill with non chlorinated water and allow that to keep the plants moist while flushing out the system.
If you find plants drooping check that there is solution in the reservoir.
If not turn off taps (both) and clean value and tubes then replace. Turn on taps and check that all is working again. Blockages can occur.
As the plants grow they will need support if tall growing or climbing.
Both the cucumber and Wallys Special Tomato are climbers. The winter one is a small bush type and likely a small thin stake in the choir is all that’s needed if any.
You have 4 wire anchors, which if you are able to run a cord from the roof of the glasshouse down to the container you use these anchors pushed sideways into the choir with the cord attached.
As the plant grows upwards you simply twist the cord around the plant for support.
This is how many commercial plantings in glasshouses are done.
Another method would be to use plastic vine mesh secured to the wall of the glasshouse to tie your plants to and even extended out near the ceiling of the house for cucumbers or tomatoes to grow over.
Even better obtain some steel mesh that is used for reinforcing concrete in drives etc to hang suspended from the ceiling of the glasshouse and the plants can be trained up to this to grow along it with the leaves near the glass and the fruit hanging down for easy picking.
Except for bush type tomato plants they are actually vines and can grow many metres long in a system such as this.
With tall growing tomatoes it is best to remove the bottom leaves progressively as they grow which exposes the set fruit and removes any insect pests that the leaves may have. (Dispose of safely)
Also with tall growing tomatoes such as Wallys Special tomato you must remove laterals as they appear at the leaf nodules otherwise with the Super Food you will have a jungle problem.
The Yellow stick pads should be used above the plants (as they are growing you can raise them) these catch a lot of invading adult insect pests and reduce problems later on in the season.
Once you have found the great benefits of growing this way you can add to the system with more containers and tanks which there are several sizes.
See our mail order web site at www.0800466464.co.nz
I am available to answer questions on 0800 466464 Happy Wallys Hydro Flow Growing…
Wally Richards Front Page of this web site